
Forming a Milanese Gauntlet in Pictures.
For those of you who are curious about the armour making process, I decided to photograph various stages while forming a left hand Milanese gauntlet. This is not intended to be a tutorial with step by step instruction but may give someone interested in making armour a few ideas as to the metal forming methods that can be used.
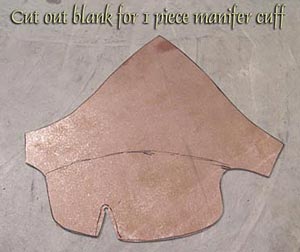 16g mild steel cut roughly to the pattern. The shape is a bit odd looking. Extra metal has been left around some areas to allow for error
or cracks and will be trimmed after forming. Because of the stress the metal will be subjected to in the raising process cracks
tend to appear in areas with sharp inside angles. To deter this, a round hole is punched between the thumb area and back of the hand. This
helps disperse the shock over a greater area and make cracking less likely.
16g mild steel cut roughly to the pattern. The shape is a bit odd looking. Extra metal has been left around some areas to allow for error
or cracks and will be trimmed after forming. Because of the stress the metal will be subjected to in the raising process cracks
tend to appear in areas with sharp inside angles. To deter this, a round hole is punched between the thumb area and back of the hand. This
helps disperse the shock over a greater area and make cracking less likely.
 The piece is bent into a tubular shape and temporarily riveted together on the back side to prevent it from bending back out during the
raising process. The picture shows the gauntlet after the wrist has been pushed inward while worked hot.
The piece is bent into a tubular shape and temporarily riveted together on the back side to prevent it from bending back out during the
raising process. The picture shows the gauntlet after the wrist has been pushed inward while worked hot.
 The metal is pushed inward most drastically in the wrist area then tapering towards the top of the cuff and back of the hand. the right hand
gauntlet cuff is formed from two pieces and of a thinner metal as it is less likely to be struck in combat. Often the right gauntlet has greater
articulation as it is the "offensive" hand holding the sword or lance.
The metal is pushed inward most drastically in the wrist area then tapering towards the top of the cuff and back of the hand. the right hand
gauntlet cuff is formed from two pieces and of a thinner metal as it is less likely to be struck in combat. Often the right gauntlet has greater
articulation as it is the "offensive" hand holding the sword or lance.
 At this stage there is still a lot of shaping to be done. Forming from this point on is more subtle so the work can be done cold.
Despite my efforts to prevent it some cracking did begin to form between the back of the hand and thumb so a second hole was punched at the
inside end of the crack. The force of hammering can also transfer into my left hand as I hold the piece. I wear a glove to help cushion the blow but
often still get small fractures in the bones of my hand and wrist which can be painful enough that I have to set the piece down and work on
simpler stuff for a few days. It feels a lot like "shin splints" from running on hard surfaces.
At this stage there is still a lot of shaping to be done. Forming from this point on is more subtle so the work can be done cold.
Despite my efforts to prevent it some cracking did begin to form between the back of the hand and thumb so a second hole was punched at the
inside end of the crack. The force of hammering can also transfer into my left hand as I hold the piece. I wear a glove to help cushion the blow but
often still get small fractures in the bones of my hand and wrist which can be painful enough that I have to set the piece down and work on
simpler stuff for a few days. It feels a lot like "shin splints" from running on hard surfaces.
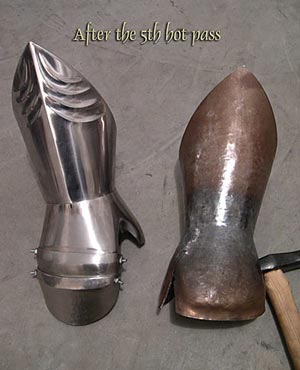
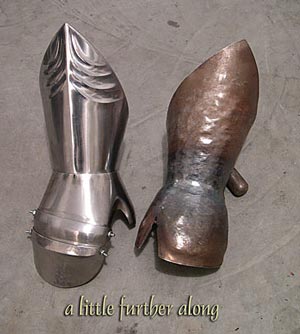
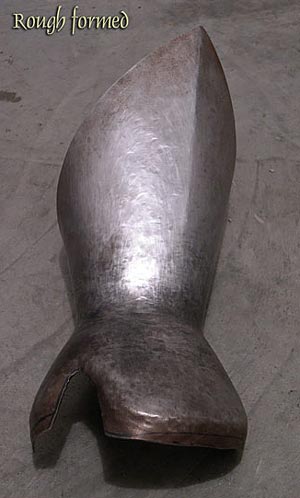 The manifer is now rough formed and has been trimmed a bit. Some refinement is still needed but can be done during the planishing process.
 The entire surface has been struck with many light hits with a polished, flat faced hammer to even out any large dings and smoothen the
surface. This is called planishing. Here a lower plate to protect the fingers has been test fitted.
The entire surface has been struck with many light hits with a polished, flat faced hammer to even out any large dings and smoothen the
surface. This is called planishing. Here a lower plate to protect the fingers has been test fitted.
 The surface is now lightly sanded to prepare it for future polishing. A reference line is drawn at the top for trimming and another
near the knuckles to indicate where the original has a recessed line.
The surface is now lightly sanded to prepare it for future polishing. A reference line is drawn at the top for trimming and another
near the knuckles to indicate where the original has a recessed line.
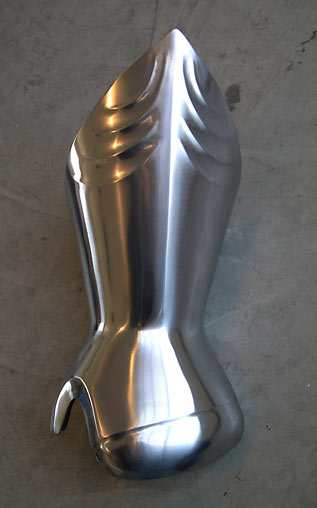
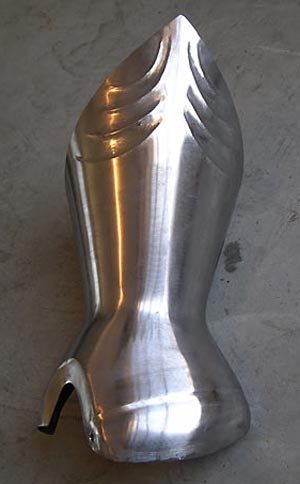 The cuff is now fluted and a recessed area has been formed near the knuckles. To achieve this a raising hammer is used to strike the outside
of the gauntlet while it is supported over a rebated, chisel shaped stake.
More on fluting can be found here.
The cuff is now fluted and a recessed area has been formed near the knuckles. To achieve this a raising hammer is used to strike the outside
of the gauntlet while it is supported over a rebated, chisel shaped stake.
More on fluting can be found here.
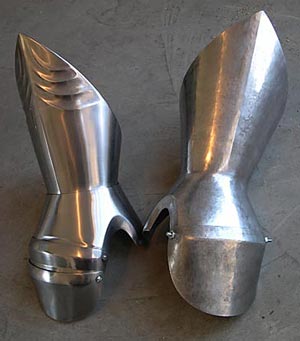
 The cuff has now been lightly sanded again and polished. It is now close to being ready to have the lining and additional components attached.
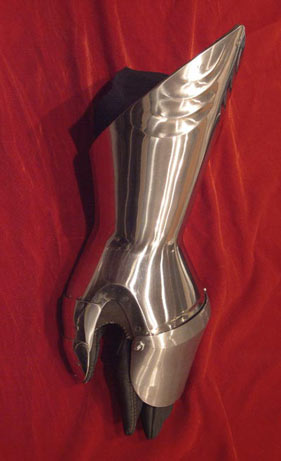 Leather strips have been blind riveted at the cuff, thumb and palm areas so that the glove lining can be stitched in. As this is a hybrid style
gauntlet, having a mitten design as well as finger plates, more plates and leather will be added to protect the tips of the fingers.
Leather strips have been blind riveted at the cuff, thumb and palm areas so that the glove lining can be stitched in. As this is a hybrid style
gauntlet, having a mitten design as well as finger plates, more plates and leather will be added to protect the tips of the fingers.
Unfortunately it appears I may have made the wrist area just slightly too small for the customer to easily get his hand in and out of the gauntlet :( He has notified me that he would also prefer a pair in stainless so this pair will be set aside until a later date. It may be some time before I can finish these but will try to update this page when I have pictures of the completed manifer.